OpenVPN
OpenVPN on the Gateway
We'll begin with installing openVPN on the gateway:
sudo apt-get install openvpn
After that, make sure our openvpn config is always used:## Comment out everything and add: # Start our openvpn.conf automatically: AUTOSTART="openvpn"
We'll need to edit some openvpn configuration files and generate some keys for the people we want to have access. There are some nice example configs, so we'll be using them. We'll need root access for the next dozen of instructions, so let's su and head to the openvpn config directory:
su
cd /etc/openvpn/
cp -r /usr/share/doc/openvpn/examples/easy-rsa/ .
Now that we got some examples to work with, let's edit them.
## Comment the line that starts with:
## export EASY_RSA
## And add this below:
export EASY_RSA=/etc/openvpn/easy-rsa/2.0

## You can also set some defaults for your certificates.
## Find the following variables and set them appropriately.
## For me I'll use the city of Amsterdam, Noord-Holland (NH) in the Netherlands (NL)
export KEY_COUNTRY=NL
export KEY_PROVINCE=NH
export KEY_CITY=Amsterdam
export KEY_ORG="FiXato-OpenVPN"
export KEY_EMAIL="fixato@an.example"
Time to source that information into our current shell session:
source ./easy-rsa/2.0/vars
And build the necessary certificates. (Certificate Authority, Server key, Client key and Diffie Hellman.)
You can probably rename your server and client(s) however you want, but need to remember the names for later configuration.
Answer yes when asked if you want to sign the certificates and want to commit them.
When it asks for a Challenge Password, you can just leave it blank and enter.
The Common Name that is asked when building a server key needs to be the same as the argument given to the build-key-server command ('server' in our example).
The Common Name that is asked when building a client key needs to be the same as the argument given to the build-key command ('client1' in our example).
./easy-rsa/2.0/clean-all
./easy-rsa/2.0/build-ca
./easy-rsa/2.0/build-key-server server
./easy-rsa/2.0/build-key client1
./easy-rsa/2.0/build-dh
We'll copy the generated keys over when we get to the Client steps. It's time now to set up the openvpn.conf we told OpenVPN to autostart:
## Add:
dev tun
proto tcp
## Change this port number if you want a non-standard port.
port 1194

ca /etc/openvpn/easy-rsa/2.0/keys/ca.crt
cert /etc/openvpn/easy-rsa/2.0/keys/server.crt
key /etc/openvpn/easy-rsa/2.0/keys/server.key
dh /etc/openvpn/easy-rsa/2.0/keys/dh1024.pem

user nobody
group nogroup
## Leave this as-is; it is the VPN virtual network address.
server 10.8.0.0 255.255.255.0

persist-key
persist-tun

status openvpn-status.log
log-append /var/log/openvpn
#verb 3
client-to-client

push "redirect-gateway def1"

# Remove comment if you want lzo compression
# comp-lzo
You might want to change your port to something else, in the light of security through obscurity. If you don't want a log and status log, comment those lines out by putting a # in front of it.
If you want to use compression, remove the # in front of the comp-lzo line. I can recommend against using comp-lzo though, since in my tests it seriously slowed down the connection.
Note: if you changed the name of the server key, the cert and key files in the above config probably need to be changed too.
Now you need to enable IP-forwarding on the server.
echo 1 > /proc/sys/net/ipv4/ip_forward
This won't be remembered across reboots though, so either make an @reboot (Vixie) crontab for it, or do as I did and edit /etc/sysctl.conf
## Uncomment the line that says
net.ipv4.ip_forward=1
If that doesn't work though, you can try adding this instead:
net.ipv4.conf.all.forwarding=1
You can drop back to being a normal user now if you are still logged in as root. You will probably need to add some rules such as opening ports and NAT forwarding to your firewall. If you are using iptables, have a look at the iptables troubleshooting section. Since you technically set up a NAT, you will most likely need to add a NAT Masquerade rule:
sudo iptables -t nat -A POSTROUTING -s 10.8.0.0/24 -o eth0 -j MASQUERADE
Be sure to replace eth0 with the network adapter that is used for your main internet connection. On OpenVZ hosts chances are this is venet0. OpenVZ hosts can complain about a missing kernel module if tap/tun is not enabled on the container at all.
The final step for the gateway server is to start OpenVPN:
sudo /etc/init.d/openvpn start
OpenVPN on the Client
On the client we need to install an OpenVPN client, for Mac OSX I use Tunnelblick which is currently hosted at Google code. After opening the .dmg file, copy the Tunnelblick.app file to your Applications. When this is done, let's transfer the client certificates from the gateway to the client, I prefer to use SCP for this.
You will probably need root ssh access to the file. If you don't have that, make sure you've copied the keys to your homedir instead. If you have created multiple client certificates, or changed the names of the certificates, then don't forget to scp those over as well.
Now that we have a client, we will need to configure it. Be sure to set your Gateway server's IP where it says YOUR-GATEWAY-IP-GOES-HERE and if you also picked a non-standard port, change that in this config as well. The same applies for any client certificates you've created on the gateway.
# We are a client, not a server/gateway.
client

# We use a TUN interface
dev tun

# We use the TCP protocol
proto tcp

# Prevent a man-in-the-middle attack by only allowing to connect to a server which has set the server-only bit on its cert (http://openvpn.net/howto.html#mitm).
remote-cert-tls server

# The hostname/IP and port of the server.
# You can have multiple remote entries
# to load balance between the servers.
## If you chose a non-standard port, change 1194 to the port you picked.
remote YOUR-GATEWAY-IP-GOES-HERE 1194

# Keep trying indefinitely to resolve the
# host name of the OpenVPN server.  Very useful
# on machines which are not permanently connected
# to the internet such as laptops.
resolv-retry infinite

# Most clients don't need to bind to
# a specific local port number.
nobind

# Downgrade privileges after initialization (non-Windows only)
user nobody
group nobody

# Try to preserve some state across restarts.
persist-key
persist-tun

# SSL/TLS parms.
# See the server config file for more
# description.  It's best to use
# a separate .crt/.key file pair
# for each client.  A single ca
# file can be used for all clients.
## If you picked different names for your client certificates, change here
ca ca.crt
cert client1.crt
key client1.key

# Enable compression on the VPN link.
# Don't enable this unless it is also
# enabled in the server config file.
# comp-lzo

# Set log file verbosity.
verb 3

# Make sure the right gateway settings are used.
push "dhcp-options DNS 10.8.0.1"
push "dhcp-options WINS 10.8.0.1"
push "redirect-gateway"
You should now be able to start Tunnelblick. It will add a new icon to the top right of your menubar. Click on it and connect to your new VPN connection!
Also check out the 'Details' options, so you can check the 'Set nameserver' checkbox.
Once you get connected, visit WhatIsMyIp.org or WhatIsMyIp.com and see if it reports your gateway's IP.
ifconfig
route -n
netstat -nr
ping 10.8.0.1
The ifconfig should report your new tun0 device and the route/netstat commands (route for Ubuntu and netstat for OSX) should show it is routing the client's traffic through your gateway server. The ping should indicate it has access to your new tun0 via the new virtual private network.
If you have problems connecting to your gateway, or resolving DNS, be sure to check out the iptables troubleshooting guide below. You will probably need to open up your firewall for your new tun0 device.
It is wise to set up a new location profile for your OpenVPN connection, where you use static/manual settings instead of DHCP. OSX seems to prioritise the DNS settings it gets from the DHCP server over the manual DNS settings set by OpenVPN, thus kinda failing domain name lookups.
Network/DNS settings
It is advised to add external DNS servers to your Network preferences. My preference goes to
OpenDNS
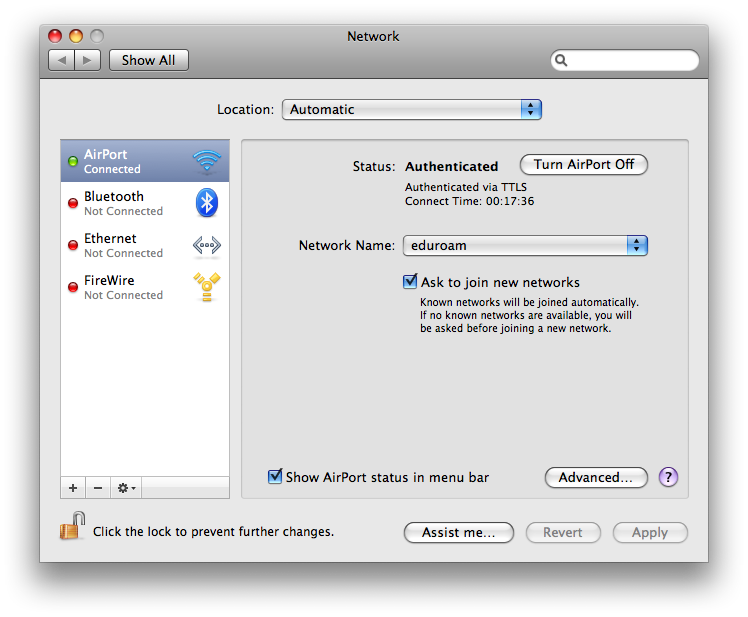
First open your Network Preferences:
 and click on the Advanced button followed by the DNS tab to get the list of DNS servers and add the OpenDNS servers (at time of writing 208.67.222.222 and 208.67.220.220) to it:
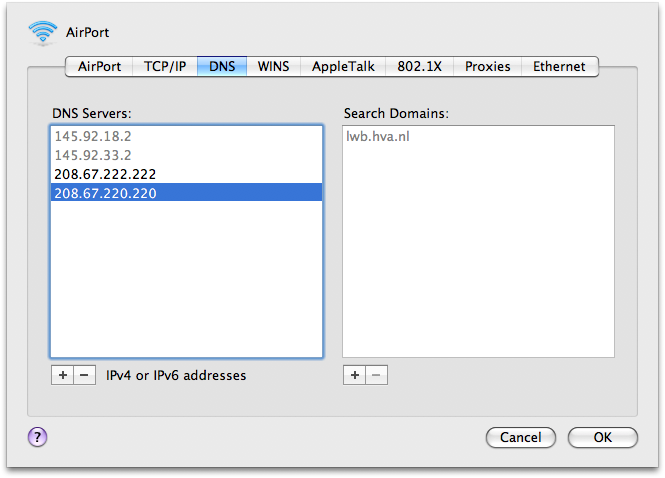 Apply these settings and your connection, even via the OpenVPN connection, should use the OpenDNS servers for domainname-lookups.